
Le Colorimètre HCFR:
HCFR (homecinema-fr.com forums) is a group of French enthusiasts who developed free software for calibration of CRT, LCD, and plasma screens as well as projectors. As their web page states "The HCFR colorimeter is a result of the collective development effort of several passionate folks from the HCFR forums". While most of the web pages are in French, the HCFR software is also written in English. Besides the free software this group has also built a colorimeter that works with the HCFR Colorimetre software. Link to do-it-yourself page leads to a very technical description on how to build this particular colorimeter (in French).
Let's stay with the software part only as it has some unique features not found elsewhere. First, the software runs on Win2000, XP, and Vista. The latest version can be downloaded from the main web site (in about the middle). Version 2.0.2 (latest version is 2.1 -2008) supports the following measuring devices: HCFR sensor (obviously), Colorvision Spyder II, X-Rite DTP-94, GretagMacbeth Eye One, and Mazet MTCS-C2 colorimeter board (German). For educational purposes, there is a "Simulated sensor" in case that you do not have any of the listed devices.
Now to the main point - how a digital photographer can benefit from this software? Some of the features are listed next:
- Reads continuously patches off the screen and reports the corresponding XYZ (xyY) data
- Can display and read buit-in RGBCMY ramps, gray steps, and any displayed patch
- Provides tools for analysis of those measurements (gamma, luminance, color temperature, etc.)
I like the point one - getting continuous measurements of any displayed patches (custom, built-in). Well, the Argyll CMS, ProfileMaker 5, and the PatchTool certainly have modules for the custom patches and the corresponding data collection. However, what about patches that you want to read "manually" and fully color managed, for example from the Adobe Photoshop. In this case, one wants to select a patch and expects radiometric readout, preferably multiple readings for the purpose of averaging. Most of the calibration/profiling softwares won't allow you to set your own targets and capture the colorimetric data based on your timing.
(top)↑ Installation:
- Download the latest version of HCFR Colorimeter and click on the downloaded file. Follow the installation messages on the screen.
- Finish by opening the HCFR Colorimeter application.
- Copy the measuring device driver to the main HCFR directory. The HCFR does not come with drivers of the proprietary measuring devices. If you successfully run your colorimeter/spectrophotometer in other application, you certainly have the right drivers.
- For the X-Rite DTP-94: copy the "XdsIII.dll" file from the \Program Files\X-Rite\.. path to the \Program Files\Colorimeter_HCF\ (main program directory). If you cannot find the file, try the \GretagMacbeth\ProfileMaker Professional 5.0.8 folder (free modules), search you computer, or simply Goggle for it.
- For the EyeOne Pro: copy the "EyeOne.dll" file (ver. 3.4.0.131, 3.12 Mb) to the same main directory \Program Files\Colorimeter_HCFR\. This file is available from the GretagMacbeth Eye-One Match 3 program (free download) from the \Program Files\GretagMacbeth\i1\Eye-One Match 3 folder. Do not forget to install the EyeOne Pro original USB driver (from the CD). Reason for that is that HCFR Colorimeter application does not recognize the "universal" LibUSB-Win32 devices and it does not work with the Argyll drivers. For installation on Vista64, see this AVSforum topic on 32- and 64-bit drivers.
- For the Spyder2: copy the “cvspyder.dll” file from the \Program Files\Colorvision\Spyder\ to \Program Files\HCFR\ folder.
- Test the attached device - discussed in the next section "Settings".
Settings:
- In the main HCFR Colorimeter window, click File->New (or Ctrl+N)
- In the just opened window "Generator selection", choose the "View Images" option and click Next.
- In the new window "Sensor selection", choose the desired device (Eye One, DTP-94, ...) and click Finish.
- A new working window will appear.
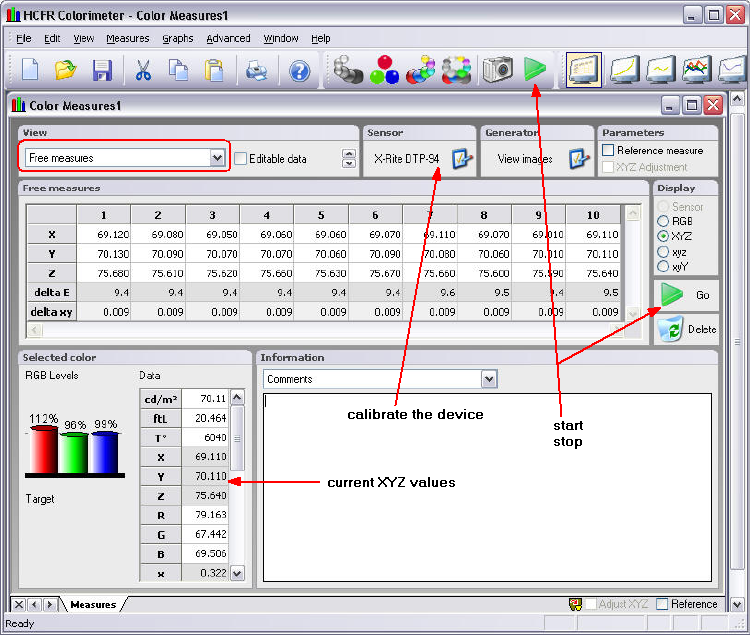
- Go to "Measures" in the main toolbar, then Sensor->Configure or just click the icon in the panel "Sensor".
- Choose carefully the "Calibration mode" (Eye One Pro, LCD) and click "Calibrate internal sensor offset" to determine the device black noise.
- At this point, you are testing connectivity of the device and its proper communication with the software.
- Message reporting the black offset appears.
(top)↑Adjustments:
- In the "Window" main toolbar, click "Cascade" to release the window.
- In the "View" main toolbar, select only "Measures Toolbar" and "Status bar" - this way the most of the toolbars will disappear and clear the area.
- Resize the main HCFR window by dragging the corners with mouse, such a way that you clearly see the "Selected color" panel and the green (start) arrow.
- Move the whole application across the desktop to make enough space for other programs (see my desktop layout - panel B).
Run it:
- Place the measuring device on the display.
- From the "View" (later "Measures") panel choose the "Continuous Measures F8" or "Free measure F9" and click the green "Start" triangle (or just the F9 key).
- Watch updating of the XYZ values in the "Selected color" panel and record them (manually writing them down or using a text snapping utility - discussed later.
- Click the red "stop" square to stop measurement.
Quite straightforward, although the USB drivers and their proper setup may require some extra time to spend. Once it is running, you have a handy tool to use for monitor calibration.
(top)↑Digital ColorChecker and the Adobe Photoshop:
In this example we will use a customized digital version of GretagMacbeth ColorChecker to assess quality of our current monitor calibration and profile. Since the display profile will serve both as a source and destination, there will be no profile transform involved. If both the calibration and profile are in sync, there should be zero error at the end. Monitor is again the Eizo CG-19.
- For a similar measurement using the BabelColor CT&A, go to this link.
- For a comparison with the PatchTool Display Check, see these examples.
- For the real data and its interpretation, go to the Imatest section.
First, the ColorChecker: we will use a customized version of the ColorChecker. I have created all 24 patches as layers in Adobe Photoshop. These values were taken from the Danny Pascale's web site. All patches have encoded L*a*b* D50, 2 degree observer values made available by GretagMacbeth in 2005. The corresponding reference data is available from the same web site as part of the following document: "RGB coordinates of the Macbeth ColorChecker" (p.5 at the top). I have also added the white and black patches, four of each. The psd file is available for download here (1.1 Mb). This is 16-bits per channel file and it is in the Lab color mode.
(top)↑
Following are the steps used for measurements of individual patches:
- Make sure that the calibration data is loaded in the video card LUT. Your profile should have been loaded at the startup or later by you using the batch file described in the Argyll's page. To double check, use the Calibration LUT Tester from the former GretagMacbeth web site.
- Make sure that your latest display profile is set as a default. Right-mouse-click on the Desktop → Properties. Other option is to open a DOS shell and type control desk.cpl followed by the Enter.
c:\any directory\>control desk.cpl
Now choose the "Settings" tab and then "Advanced". Click on "Color Management " tab and confirm that your profile is listed and that it is set as a default. If not, choose the "Add" tab and browse for the desired profile. Click OK, OK to close the windows. - In Photoshop, open the downloaded file "Macbeth_ColorChecker_Lab16bit_patches.psd". Convert it to the latest display profile (Edit -> Convert to Profile) with absolute colorimetric rendering intent. This creates the same profile for the source and destination (display) resulting in no transform. Gamut primaries correspond to the monitor primaries determined during the calibration/profiling steps. On the Layers palette, check the first white patch at the bottom.
- Attach your measuring device to the computer (typically via any USB input).
- Open the HCFR Colorimeter application. Prepare it for a measurement (described above) and position it conveniently on your desktop (area B in the snapshot below).
- Place the Photoshop white patch window into the middle of the screen and place the measuring device over it (C in the snapshot below).
- Optional - setup the Hypersnap text capture (area E in the snapshot below).
- Start measurements by running the HCFR Colorimeter (click the green triangle).
- Measure all four white and black patches consecutively and for each record the XYZ tristimulus data. If using the HyperSnap, press the CTRL+Shift+F11 keys on your keyboard. Otherwise write the values down, preferably directly into a spreadsheet.
- Continue with measurements of all remaining 24 patches. Record four measurements per each patch (these will be later averaged).
- When done, stop the HCFR measurements, remove the measuring device and save your captured data.
- Close the Photoshop and DO NOT SAVE THE COLORCHECKER FILE. The file has been converted to a monitor profile and would be useless for your next measurement .
Here is a snapshot of my desktop arrangement when running the measurements.

Click here or on the picture to get the full size image.
Now when measurements are done, the data has to be processed. This part is automated and can be performed in the Excel spreadsheet. Download it here (316KB, Gretag_CC.xls).
Here is briefly how to use it (enable macros!!):
- Import (paste/enter) the acquired data into the sheet "data_in", column I3:417. You can conveniently use the neighboring column J to first match the data length and the row alignment. Once the data is there, XYZ components are normalized and can be copy/pasted into the main tab - "process".
- In the "Process" sheet, manually do the Edit->paste-special (values) into the blue range K10-M33.
- Click the "1. Clear" macro button in the sheet to clear the old data.
- Click the "2. Convert to D50" macro button to convert the XYZ data recorded at the monitor white point to the D50 illuminant. The corresponding L*a*b* (D50) data is also calculated.
- Click the "3. Calc DE2000" macro button to calculate the color difference and other colorimetric and statistical parameters.
- Optionally, there are three other tabs useful for further analysis. The "Analysis" tab combines all the data into one area. One can plot the data in a graphical form. The other two tabs - "LOGO_Lab" and "LOGO_GM50" are formatted to output the specific LOGO format for further analysis in the ColorThink Pro or the PatchTool. Just click the macro button on the respective tab. Files are created in the same directory as the main worksheet.
This concludes the HCFR-Photoshop measurement example. While the overall process may seem quite involved, it is not that difficult to master.
(top)↑Notes:
This section is reserved for comments and tips from other users.